Fancy doing something more with your home network? Or are you already up and running with a NAS device, a simple server of some kind, or a bunch of smart home gadgets you’d like to get more control over? Join us for this collection of advanced networking tips.
Other articles in this series:
- How to choose a new router and get started with important settings
- Solve your Wi-Fi problems with these smart router settings
- Protect your home network with these essential router tweaks
- More than Internet: 9 tips to maximize your home network
1. Switch to alternative router software
Do you have a reasonably powerful router but have become curious about more advanced features missing from the settings? You don’t necessarily need to buy a new router or build your own, but alternative software can go a long way.
Openwrt is one of the oldest open source router software projects, and is still being developed so that it can be installed on many router models from different manufacturers.
Long ago, DD-WRT was common, but that project has not been updated for a long time. Tomato was another popular option, but died many years ago. Freshtomato is the name of a variant that has kept going and can still be a sensible alternative.
Foundry
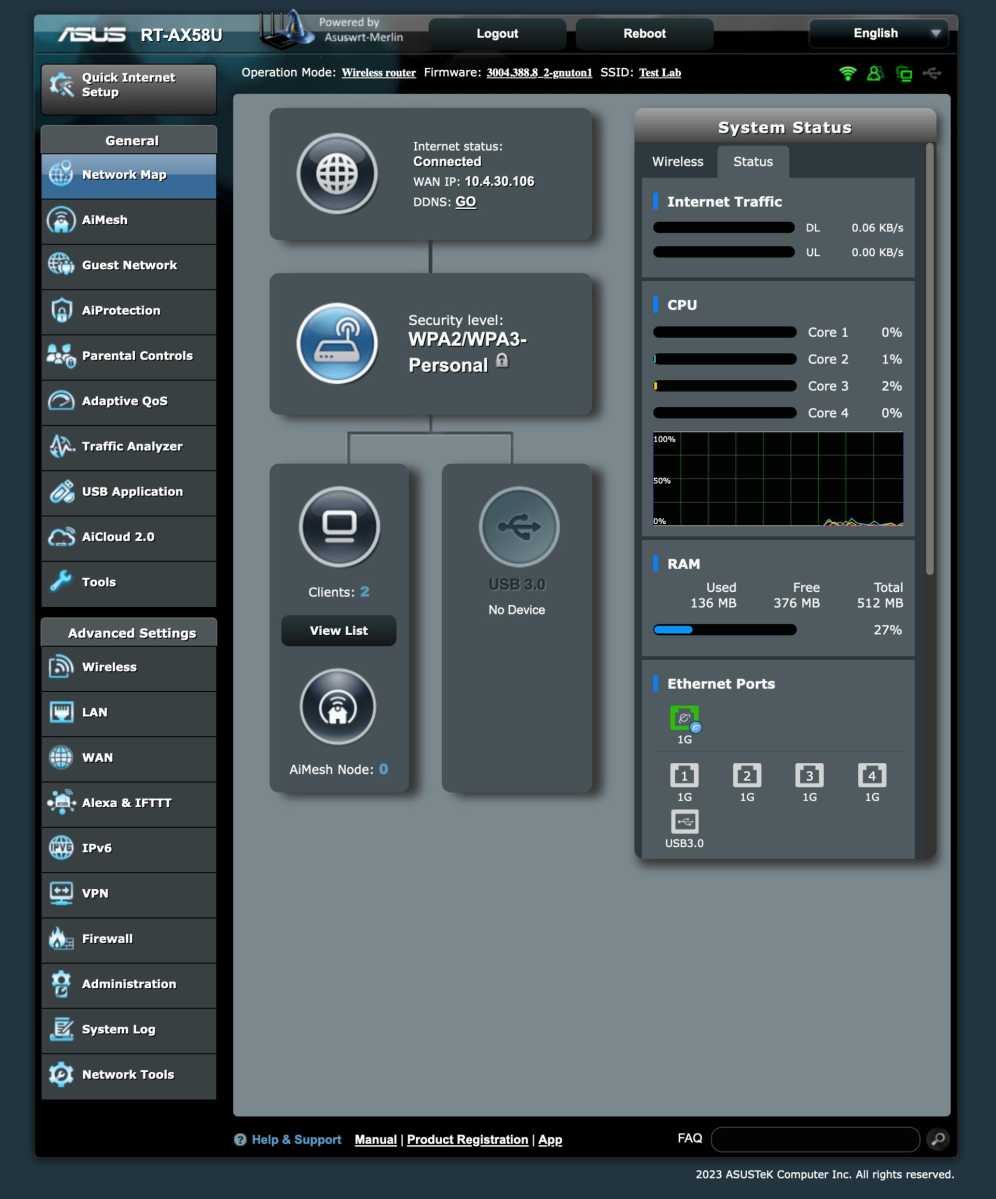
For users with an Asus router, there is the Asuswrt-Merlin project with the same user interface as the bundled system, but with a number of additional features and settings. It is definitely the easiest way to get started with alternative software.
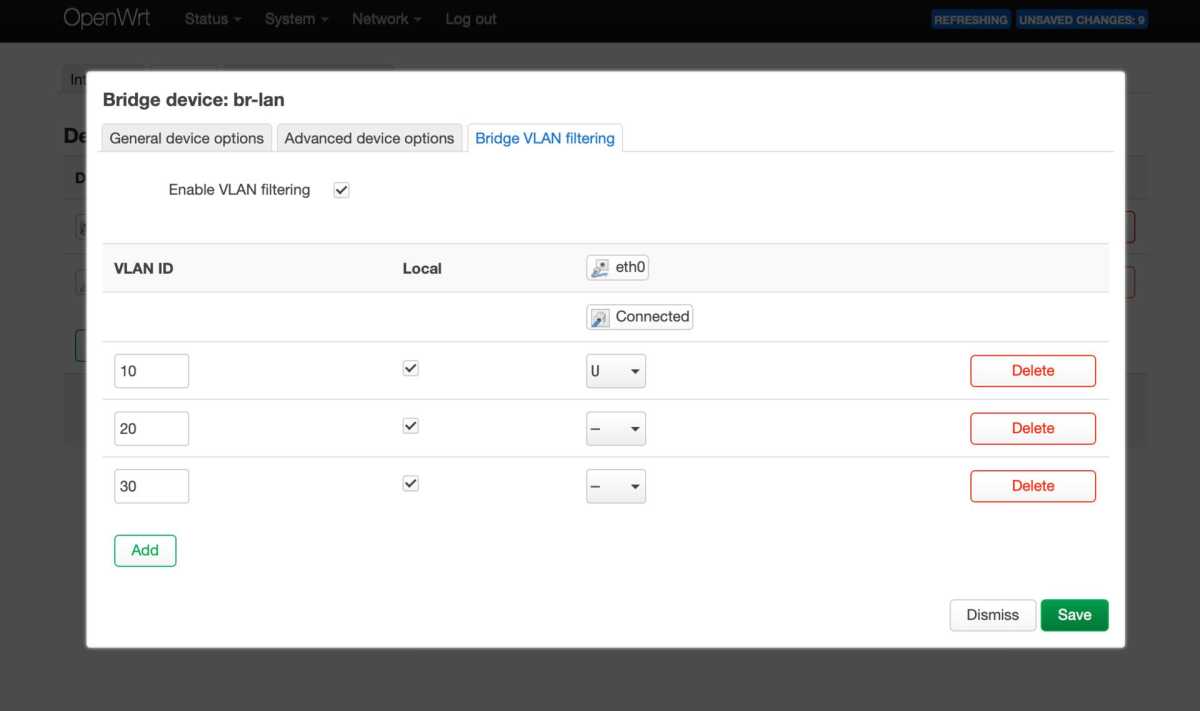
Openwrt is the most capable option, with support for features like VLAN and advanced quality of service features like Smart Queue Management. However, it’s also a little trickier to install and has a steeper learning curve for beginners.
Simply Nuc
2. Separate router/firewall and Wi-Fi
Workplaces almost always use separate devices for different parts of the network, each specializing in its own task. Access points for Wi-Fi, switches to connect different devices (including the access points) via Ethernet, and a router to link the local network with the internet. Firewalls are often built into routers, but can also be separate devices.
This division obviously requires more fiddling than a combined router/switch/access point, but the setup can be useful even in homes, especially if you have many devices of different kinds.
If you’re curious and want to try it out, you can do so relatively cheaply by keeping your current router (or mesh routers if you have a set of them), set to act as an access point. Most routers have this setting.
Then you install any open router operating system of your choice, either on an old computer you have on hand or a new cheap one — Openwrt works well on Raspberry Pi, for example, but you can also go for a more advanced operating system like Pfsense or Opnsense on a mini PC with an Intel or AMD processor. All you need is at least two Ethernet connectors and a reasonably powerful processor. For Raspberry Pi, you can get an additional connector with a so-called HAT+. There are models with dual 2.5 gigabit connectors.
Finally, get a switch and connect both your old router or routers and the new router to it. The cable from the wall that you normally connect to the router’s WAN connector, you connect to a different port in the new router. In the settings for Openwrt or whatever you have chosen, you then set the two connectors to act as WAN and LAN respectively.
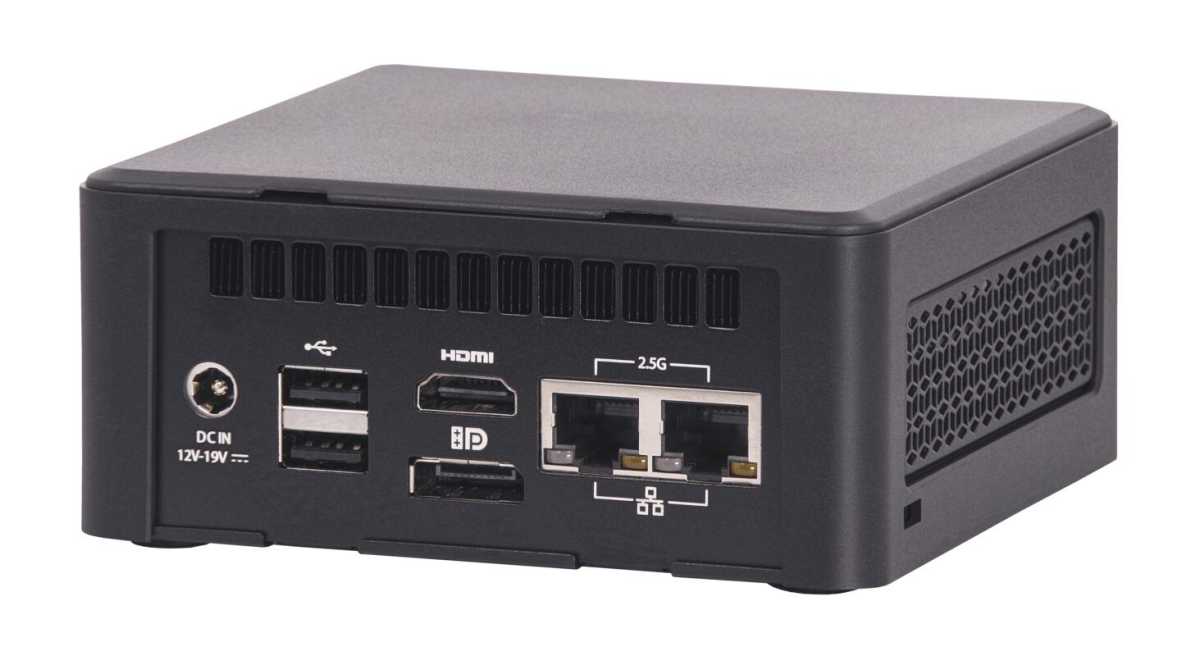
The hardware in a mini PC like an Intel NUC is significantly more powerful than any consumer router and makes it possible to run advanced security features, for example.
Anders Lundberg
3. Network segmentation with VLAN
If you’re using guest networking on your router today, you’ve had a taste of what’s possible with a technology called VLAN. VLAN separates traffic on the network so that it can be kept apart for different purposes. This is done at a basic level and is set up in routers, switches, and Wi-Fi access points.
By creating different VLAN, different devices can be kept separate in different address spaces and with different sets of rules in the firewall. Among home users, perhaps the most common use case is to create a VLAN for IoT — the internet of things, i.e. smart home gadgets.
This makes it easy to protect other devices in the home in case a connected device is hacked or already contains malware, and to block internet access for devices that have nothing to do with the internet.
In my own home, I’ve done this to switch off the internet for all smart home devices, such as cameras that want to connect to the manufacturer’s servers — you’ve probably heard about how Ring, for example, has repeatedly mixed up different customers’ cameras so that customers have been able to watch video from each other’s homes.
I use my cameras locally using the Home Assistant smart home center and Scrypted software, with Apple’s Homekit for remote control because I trust Apple more than various more or less unknown manufacturers. Without VLAN, this would be much more complicated, and less secure.
Another common use is a so-called demilitarized zone (DMZ) for servers that should be open to the internet. For example, say you run a Minecraft server so that you and/or your children and grandchildren can play with each other, and you want it to be accessible from outside. With a DMZ-VLAN, it’s easy to do this in a reasonably secure way by setting the firewall to prevent the server from accessing the rest of the network.
Foundry
Getting started with VLAN
Setting up VLAN isn’t really super complicated, but how you do it differs greatly in different router operating systems and a step-by-step description would take up the rest of this article. My recommendation if you are interested is to search for guides to VLAN on the system you are using, for example on Youtube.
For Openwrt, this guide from Open Source is awesome, with both video and text.
If you want to use VLAN with gadgets that connect with an Ethernet cable, it’s a good idea to get a so-called managed switch, that is, a switch with a simple operating system and settings you can access over the network.
Ubiquiti’s Unifi is a popular product line among networking enthusiasts, and in addition to such switches, it also offers Wi-Fi access points that make it easy to create separate wireless networks for devices that will use different WLANs. It works like a more advanced form of guest networking, where you set the rules for how connected devices can communicate with the internet and other parts of the network.
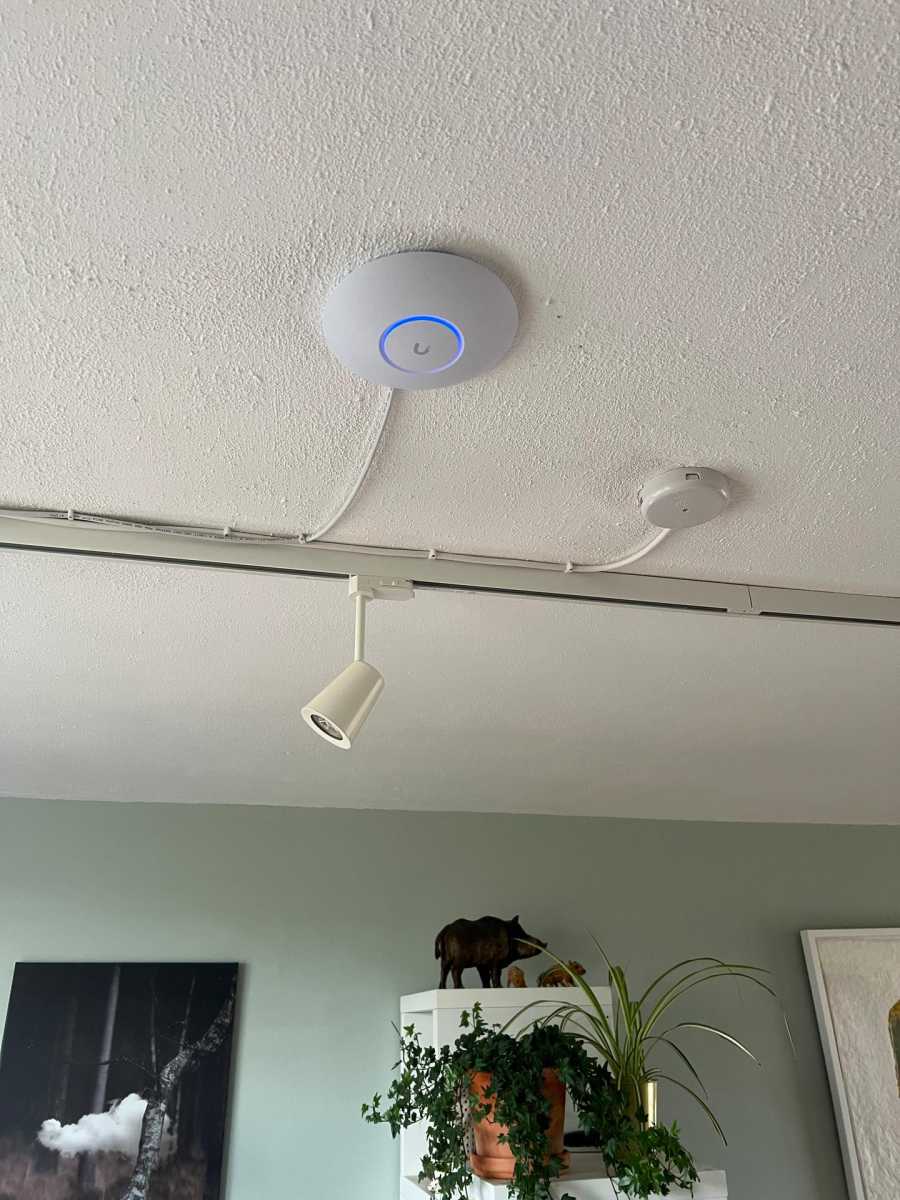
In my home, I have three Wi-Fi networks, two of which are virtual, each connected to a different VLAN: one for the family’s various phones and computers, one for smart home gadgets and one for guests. I also have a couple of smart home hubs connected by cable to a managed switch. In the settings of the switch, I have set those particular connectors to use the same VLAN as the wireless smart home network.
As I said, the smart home devices usually have no access to the internet and are only allowed to communicate with the regular network via something called Multicast DNS (MDNS), which in my case is required to get updates via Apple’s Homekit, for example when someone rings the doorbell.
Foundry
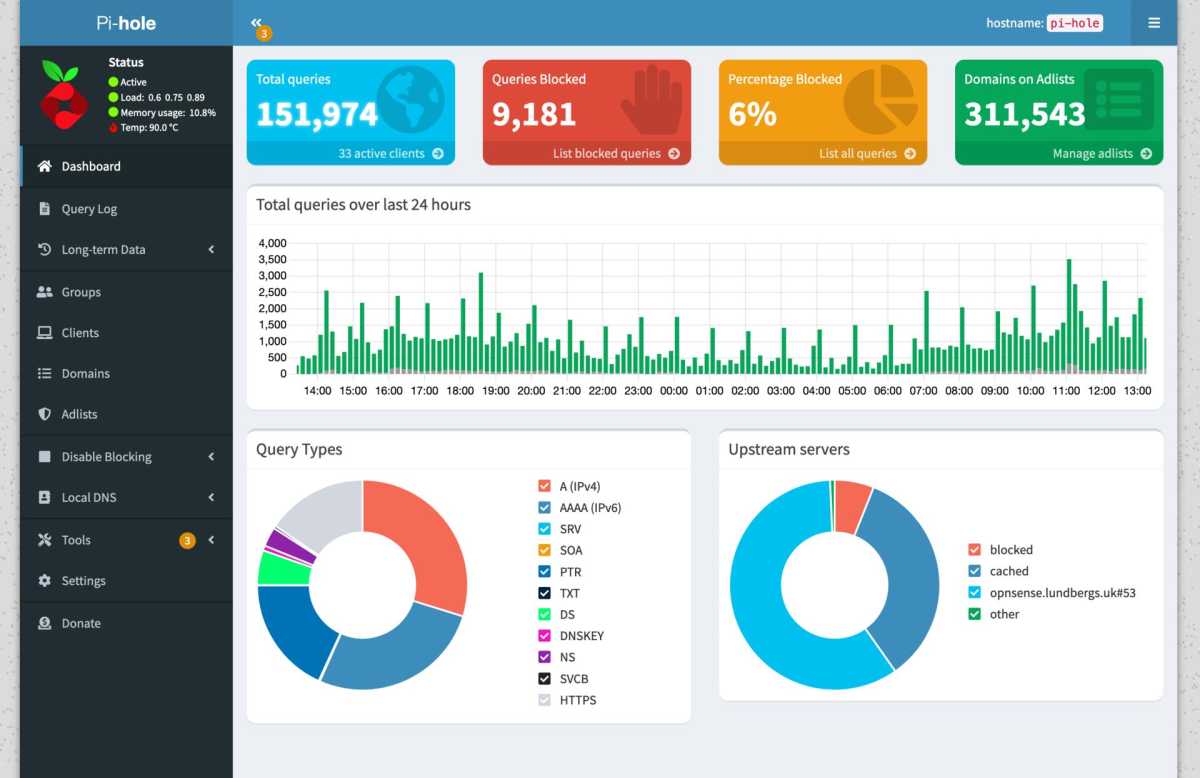
4. Pi-Hole for advertising- and tracking-blocking across the network
On mobiles and computers, it’s relatively easy to install content blockers that stop advertising and especially web tracking. But on TVs and other gadgets, this is rarely possible. One way to effectively protect the entire home network including such devices is with Pi-Hole.
Pi-Hole is a local DNS server with blocking of malicious, inappropriate, or unwanted domains. You add one or more links to blocklists, and Pi-Hole takes care of the rest. There are specific lists for advertising, tracking, malware, pornography, and various others. The name comes from the Raspberry Pi, and with very low system requirements, it’s a great use case for an older model of the small computer.
Stop other DNS services
When you have your own DNS server like Pi-Hole, it can be a good idea to block devices in your home from connecting to other DNS servers. You can do this with the firewall in your router.
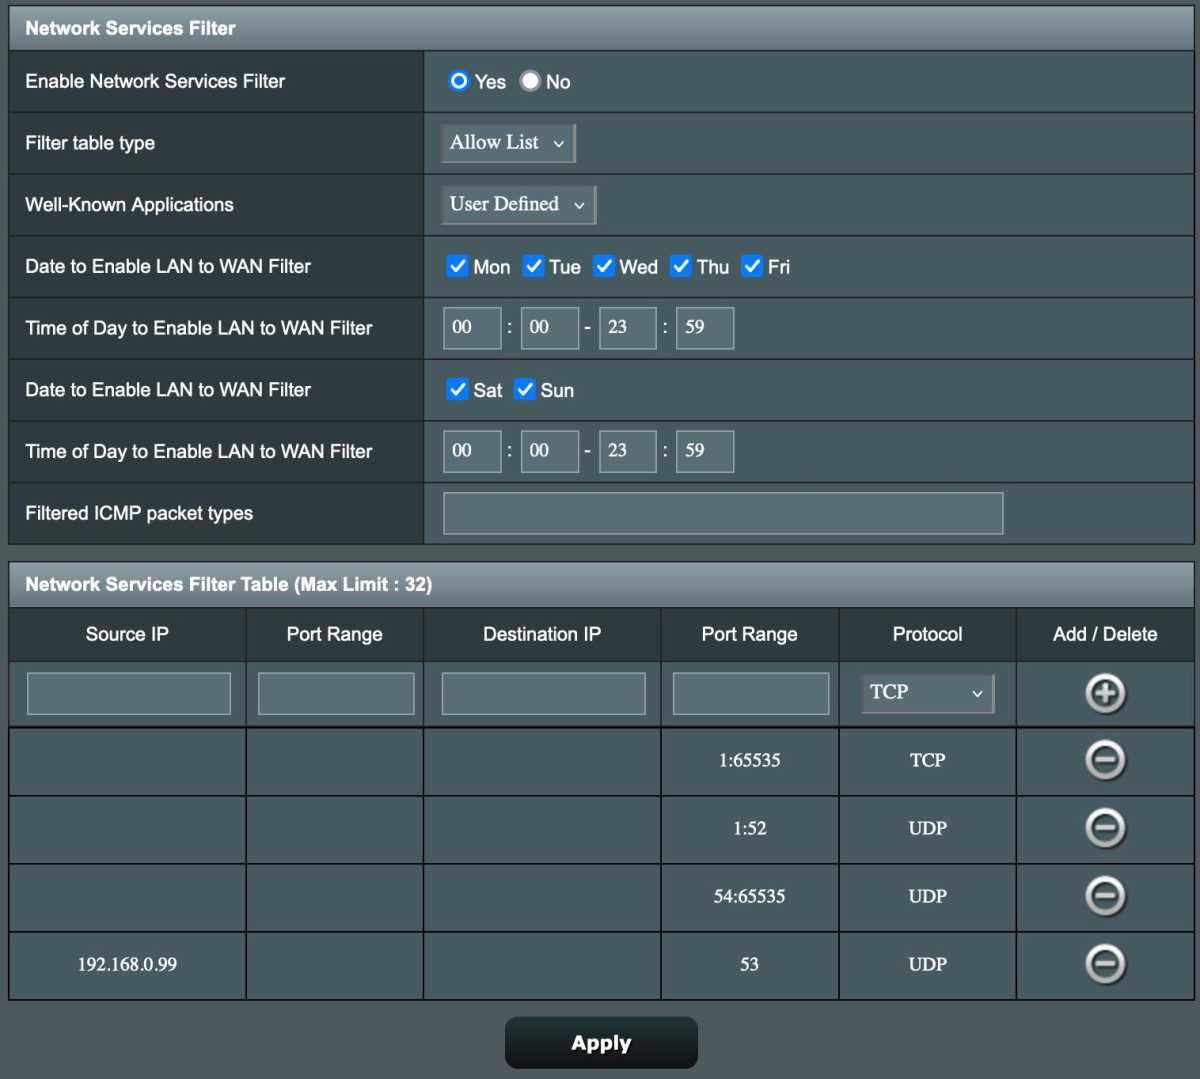
For a traditional firewall, it involves two rules. One that blocks all traffic over TCP and UDP on port 53 and one that allows the same traffic with destination Pi-Hole. Exactly how you do this differs between different manufacturers.
Foundry
On Asus routers, use the Network Services Filter tab under Firewall. Activate the function and make sure that the filter table is of type Allow List. Then fill in four rules as shown in the image below. Replace 192.168.0.99 with your Pi-Hole’s IP address. The slightly reversed rules will open all traffic except UDP on port 53 for all devices, and also port 53 for the Pi-Hole.
You should also set the router itself to use the Pi-Hole’s IP address as DNS under WAN, and as DNS server for devices connecting via DHCP under LAN > DCHP Server.
The catch with this solution is that devices with hardcoded DNS servers will not work properly, as the rules only block connections to other DNS servers and do not forward all DNS traffic to Pi-Hole. If you switch to the alternative software Asuswrt-Merlin (see above), you can use the LAN > DNS Filter function instead. Set Global Filter Mode to Router and add a rule to not filter traffic from Pi-Hole’s IP address.
Today, some devices and individual programs and apps bypass your regular DNS with the DNS over HTTPS (DoH) technique, making regular port 53 blocking ineffective. It can be partially stopped with a blocklist of known DoH servers (here is an example https://github.com/dibdot/DoH-IP-blocklists/blob/master/doh-domains.txt), but it is a cat-and-mouse game.
Foundry
5. Access your home from outside securely with a VPN server
Have you bought a NAS device or built a server of some kind, for example for gaming or media streaming? Then you may have wondered if it is possible to access these from outside, when you are not at home. Opening ports in the router to let yourself in is risky, as bots constantly scan the network for possible entry points.
A safer way is to run your own VPN server and only open one port for it. Some routers also come with a built-in VPN server that makes it easier to get started and provides secure access to services on the home network.
There are a bunch of different VPN protocols. In the past, PPTP and L2TP were common, but the former is insecure and newer technologies are better than the latter. Today, Openvpn and Wireguard are most common.
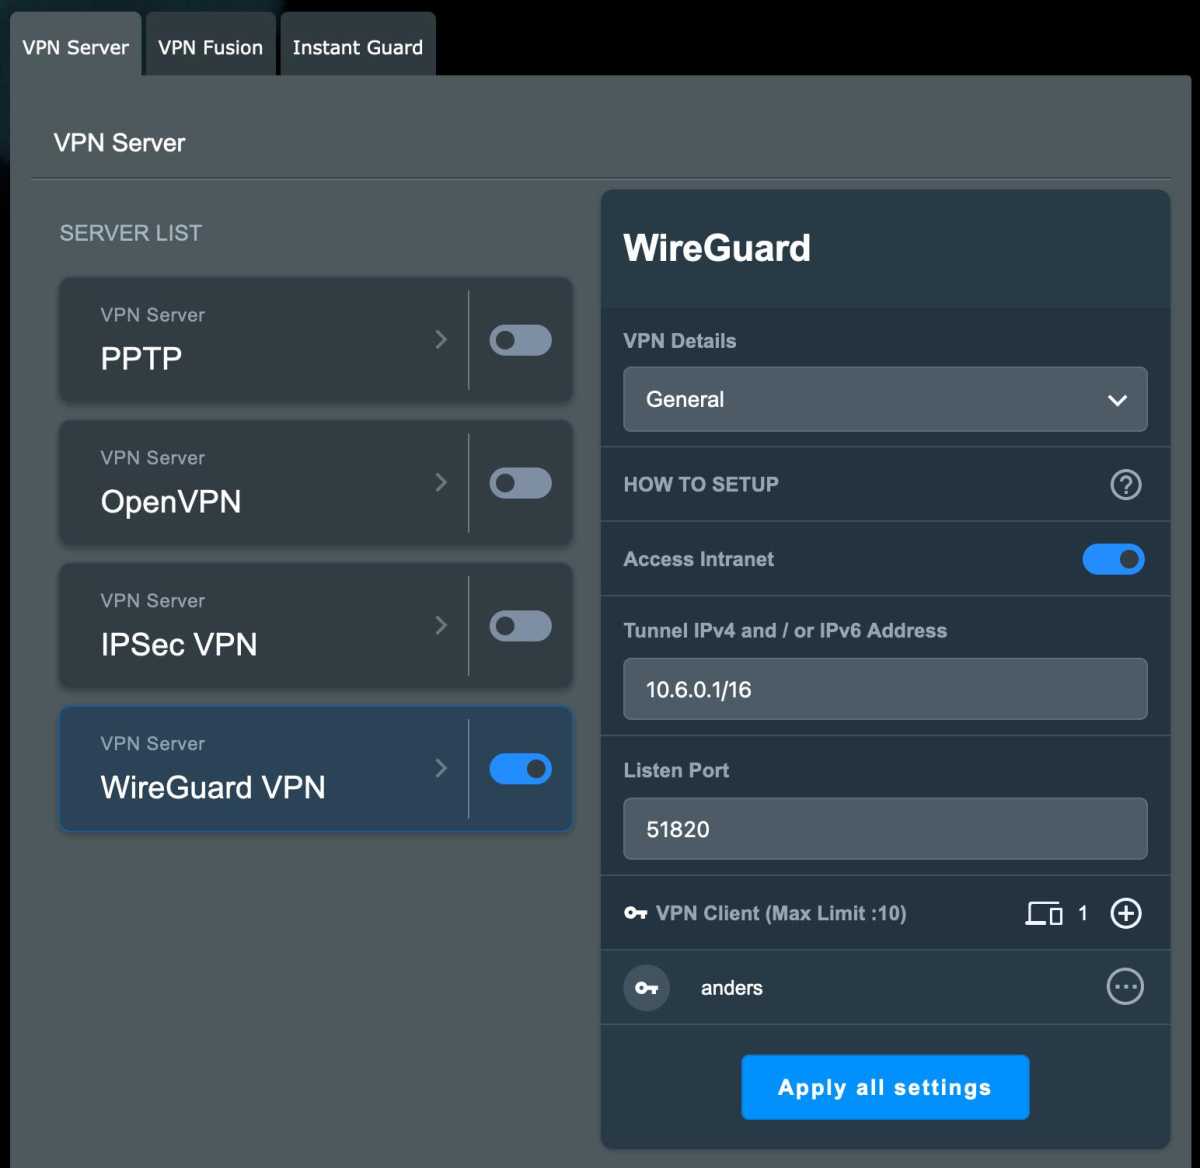
Newer Asus routers have a built-in VPN server with several different technologies to choose from. Here’s how to set up Wireguard so you can connect to devices on your home network, without sending all traffic through the tunnel.
Foundry
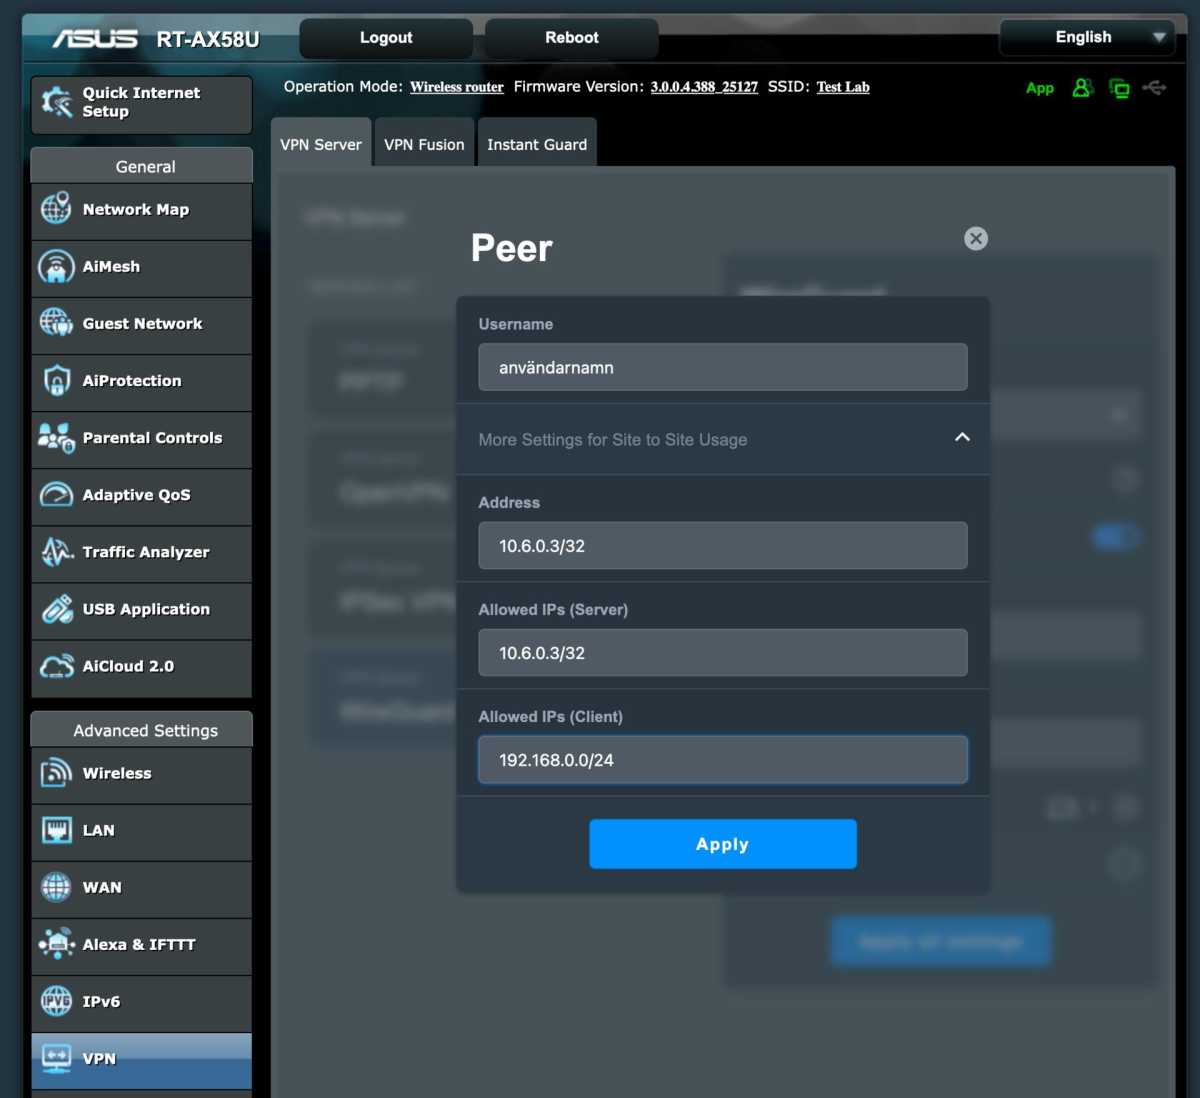
- Open the router settings and click VPN in the menu on the left.
- Click on Wireguard VPN.
- Click the plus button on the right on VPN Client in the bottom right.
- Enter a name for the user and click More Settings for Site to Site.
- You can leave the Address and Allowed IPs (Server) as they are, but if you only want to send traffic going to your local network at home over the VPN tunnel, change the Allowed IPs (Client) to your local network’s address range, for example 192.168.0.0/24 if all devices in your home have addresses starting with 192.168.0. If you have 192.168.1 addresses, it will be 192.168.1.0/24 and so on. Click Apply.
Foundry
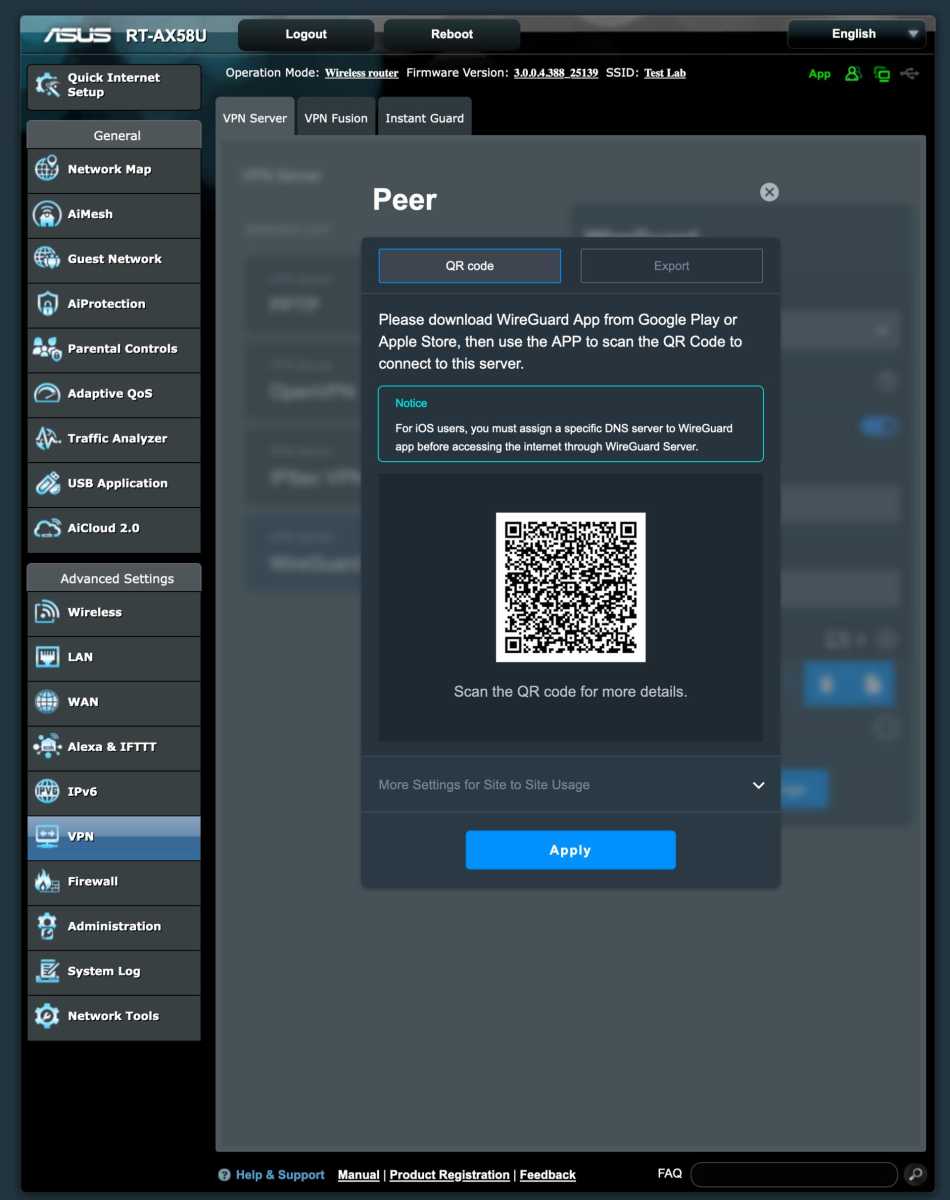
It will now display a QR code that you can scan from the Wireguard app on your mobile phone to easily connect to your home. You can also export the settings to add the connection on devices that cannot scan QR codes.
If you prefer, you can leave Allowed IPs (Client) at 0.0.0.0/0 and all traffic from the device you connect with will be sent over the tunnel, and then your home will act much like a commercial VPN service. This can come in handy if you’re abroad but want to browse as if you’re at home, or if you have a Pi-Hole server that blocks adverts and other stuff and want to use it no matter where you are.
Fancy doing something more with your home network? Or are you already up and running with a NAS device, a simple server of some kind, or a bunch of smart home gadgets you’d like to get more control over? Join us for this collection of advanced networking tips.
Other articles in this series:
How to choose a new router and get started with important settings
Solve your Wi-Fi problems with these smart router settings
Protect your home network with these essential router tweaks
More than Internet: 9 tips to maximize your home network
1. Switch to alternative router software
Do you have a reasonably powerful router but have become curious about more advanced features missing from the settings? You don’t necessarily need to buy a new router or build your own, but alternative software can go a long way.
Openwrt is one of the oldest open source router software projects, and is still being developed so that it can be installed on many router models from different manufacturers.
Long ago, DD-WRT was common, but that project has not been updated for a long time. Tomato was another popular option, but died many years ago. Freshtomato is the name of a variant that has kept going and can still be a sensible alternative.
Foundry
For users with an Asus router, there is the Asuswrt-Merlin project with the same user interface as the bundled system, but with a number of additional features and settings. It is definitely the easiest way to get started with alternative software.
Openwrt is the most capable option, with support for features like VLAN and advanced quality of service features like Smart Queue Management. However, it’s also a little trickier to install and has a steeper learning curve for beginners.
Simply Nuc
2. Separate router/firewall and Wi-Fi
Workplaces almost always use separate devices for different parts of the network, each specializing in its own task. Access points for Wi-Fi, switches to connect different devices (including the access points) via Ethernet, and a router to link the local network with the internet. Firewalls are often built into routers, but can also be separate devices.
This division obviously requires more fiddling than a combined router/switch/access point, but the setup can be useful even in homes, especially if you have many devices of different kinds.
If you’re curious and want to try it out, you can do so relatively cheaply by keeping your current router (or mesh routers if you have a set of them), set to act as an access point. Most routers have this setting.
Then you install any open router operating system of your choice, either on an old computer you have on hand or a new cheap one — Openwrt works well on Raspberry Pi, for example, but you can also go for a more advanced operating system like Pfsense or Opnsense on a mini PC with an Intel or AMD processor. All you need is at least two Ethernet connectors and a reasonably powerful processor. For Raspberry Pi, you can get an additional connector with a so-called HAT+. There are models with dual 2.5 gigabit connectors.
Finally, get a switch and connect both your old router or routers and the new router to it. The cable from the wall that you normally connect to the router’s WAN connector, you connect to a different port in the new router. In the settings for Openwrt or whatever you have chosen, you then set the two connectors to act as WAN and LAN respectively.
The hardware in a mini PC like an Intel NUC is significantly more powerful than any consumer router and makes it possible to run advanced security features, for example.
Wi-Fi access point with multiple VLAN-separated networks.Anders Lundberg
3. Network segmentation with VLAN
If you’re using guest networking on your router today, you’ve had a taste of what’s possible with a technology called VLAN. VLAN separates traffic on the network so that it can be kept apart for different purposes. This is done at a basic level and is set up in routers, switches, and Wi-Fi access points.
By creating different VLAN, different devices can be kept separate in different address spaces and with different sets of rules in the firewall. Among home users, perhaps the most common use case is to create a VLAN for IoT — the internet of things, i.e. smart home gadgets.
This makes it easy to protect other devices in the home in case a connected device is hacked or already contains malware, and to block internet access for devices that have nothing to do with the internet.
In my own home, I’ve done this to switch off the internet for all smart home devices, such as cameras that want to connect to the manufacturer’s servers — you’ve probably heard about how Ring, for example, has repeatedly mixed up different customers’ cameras so that customers have been able to watch video from each other’s homes.
I use my cameras locally using the Home Assistant smart home center and Scrypted software, with Apple’s Homekit for remote control because I trust Apple more than various more or less unknown manufacturers. Without VLAN, this would be much more complicated, and less secure.
Another common use is a so-called demilitarized zone (DMZ) for servers that should be open to the internet. For example, say you run a Minecraft server so that you and/or your children and grandchildren can play with each other, and you want it to be accessible from outside. With a DMZ-VLAN, it’s easy to do this in a reasonably secure way by setting the firewall to prevent the server from accessing the rest of the network.
Foundry
Getting started with VLAN
Setting up VLAN isn’t really super complicated, but how you do it differs greatly in different router operating systems and a step-by-step description would take up the rest of this article. My recommendation if you are interested is to search for guides to VLAN on the system you are using, for example on Youtube.
For Openwrt, this guide from Open Source is awesome, with both video and text.
If you want to use VLAN with gadgets that connect with an Ethernet cable, it’s a good idea to get a so-called managed switch, that is, a switch with a simple operating system and settings you can access over the network.
Ubiquiti’s Unifi is a popular product line among networking enthusiasts, and in addition to such switches, it also offers Wi-Fi access points that make it easy to create separate wireless networks for devices that will use different WLANs. It works like a more advanced form of guest networking, where you set the rules for how connected devices can communicate with the internet and other parts of the network.
In my home, I have three Wi-Fi networks, two of which are virtual, each connected to a different VLAN: one for the family’s various phones and computers, one for smart home gadgets and one for guests. I also have a couple of smart home hubs connected by cable to a managed switch. In the settings of the switch, I have set those particular connectors to use the same VLAN as the wireless smart home network.
As I said, the smart home devices usually have no access to the internet and are only allowed to communicate with the regular network via something called Multicast DNS (MDNS), which in my case is required to get updates via Apple’s Homekit, for example when someone rings the doorbell.
Foundry
4. Pi-Hole for advertising- and tracking-blocking across the network
On mobiles and computers, it’s relatively easy to install content blockers that stop advertising and especially web tracking. But on TVs and other gadgets, this is rarely possible. One way to effectively protect the entire home network including such devices is with Pi-Hole.
Pi-Hole is a local DNS server with blocking of malicious, inappropriate, or unwanted domains. You add one or more links to blocklists, and Pi-Hole takes care of the rest. There are specific lists for advertising, tracking, malware, pornography, and various others. The name comes from the Raspberry Pi, and with very low system requirements, it’s a great use case for an older model of the small computer.
Stop other DNS services
When you have your own DNS server like Pi-Hole, it can be a good idea to block devices in your home from connecting to other DNS servers. You can do this with the firewall in your router.
For a traditional firewall, it involves two rules. One that blocks all traffic over TCP and UDP on port 53 and one that allows the same traffic with destination Pi-Hole. Exactly how you do this differs between different manufacturers.
Foundry
On Asus routers, use the Network Services Filter tab under Firewall. Activate the function and make sure that the filter table is of type Allow List. Then fill in four rules as shown in the image below. Replace 192.168.0.99 with your Pi-Hole’s IP address. The slightly reversed rules will open all traffic except UDP on port 53 for all devices, and also port 53 for the Pi-Hole.
You should also set the router itself to use the Pi-Hole’s IP address as DNS under WAN, and as DNS server for devices connecting via DHCP under LAN > DCHP Server.
The catch with this solution is that devices with hardcoded DNS servers will not work properly, as the rules only block connections to other DNS servers and do not forward all DNS traffic to Pi-Hole. If you switch to the alternative software Asuswrt-Merlin (see above), you can use the LAN > DNS Filter function instead. Set Global Filter Mode to Router and add a rule to not filter traffic from Pi-Hole’s IP address.
Today, some devices and individual programs and apps bypass your regular DNS with the DNS over HTTPS (DoH) technique, making regular port 53 blocking ineffective. It can be partially stopped with a blocklist of known DoH servers (here is an example https://github.com/dibdot/DoH-IP-blocklists/blob/master/doh-domains.txt), but it is a cat-and-mouse game.
Foundry
5. Access your home from outside securely with a VPN server
Have you bought a NAS device or built a server of some kind, for example for gaming or media streaming? Then you may have wondered if it is possible to access these from outside, when you are not at home. Opening ports in the router to let yourself in is risky, as bots constantly scan the network for possible entry points.
A safer way is to run your own VPN server and only open one port for it. Some routers also come with a built-in VPN server that makes it easier to get started and provides secure access to services on the home network.
There are a bunch of different VPN protocols. In the past, PPTP and L2TP were common, but the former is insecure and newer technologies are better than the latter. Today, Openvpn and Wireguard are most common.
Newer Asus routers have a built-in VPN server with several different technologies to choose from. Here’s how to set up Wireguard so you can connect to devices on your home network, without sending all traffic through the tunnel.
Foundry
Open the router settings and click VPN in the menu on the left.
Click on Wireguard VPN.
Click the plus button on the right on VPN Client in the bottom right.
Enter a name for the user and click More Settings for Site to Site.
You can leave the Address and Allowed IPs (Server) as they are, but if you only want to send traffic going to your local network at home over the VPN tunnel, change the Allowed IPs (Client) to your local network’s address range, for example 192.168.0.0/24 if all devices in your home have addresses starting with 192.168.0. If you have 192.168.1 addresses, it will be 192.168.1.0/24 and so on. Click Apply.
Foundry
It will now display a QR code that you can scan from the Wireguard app on your mobile phone to easily connect to your home. You can also export the settings to add the connection on devices that cannot scan QR codes.
If you prefer, you can leave Allowed IPs (Client) at 0.0.0.0/0 and all traffic from the device you connect with will be sent over the tunnel, and then your home will act much like a commercial VPN service. This can come in handy if you’re abroad but want to browse as if you’re at home, or if you have a Pi-Hole server that blocks adverts and other stuff and want to use it no matter where you are. Read More


